Monday 24 December 2012

Saturday 22 December 2012

New 'Inkspirational' Challenge Blog!

In January 2013 there will be a new challenge blog launching.  It's called Inkspirational and is the brainchild of that crafty whirlwind Mynnette Kitchen!  I was chuffed to bits to be selected to serve on the DT and am really looking forward to the challenges starting in the new year! 

The DT has been split into two teams and the weekly challenges will be posted on Wednesdays but there will also be an 'end of the week encouragement' post on Saturdays.  Half of the DT will be showcased on Wednesdays and the other half on Saturdays.  Week one of the month will be a Colour Challenge, week two will be a Photo Challenge, week 3 will be a CASE Challenge and week four will be a Sketch Challenge.  If there happens to be a fifth week in a month then there will be an Anything Goes challenge on the fifth week.  There will be lots to inspire your creativity - plus there will be sponsor prizes on offer too!

To kick things off in style we're offering a few Followers and Facebook Friends giveaways so please check it out and I really hope to see you playing along with us!    

Photobucket

Row of Trees Merry Christmas Kickstand Card

I made this gingerbread card a while back and said at the time I wanted to make a trees version and here it is!  I've used the same size card and layout but with the different colours and images I've got a whole different feel to this card.  While the gingerbread card is fun and playful, I feel this trees version is more grown up and sophisticated!  I added Star Dust Stickles to the dots on the trees and I topped each tree with a holographic sequin with a jewel in the centre.  The sentiment label also had some bling added and I popped the label up.


Here's the inside.

And here's the envelope.  I just love that non traditional Christmas patterned paper, what a gorgeous colour and design!


Supplies:
Stamps: SU! 'Scentsational Season' & 'Owl Occasions' sets, Stampendous 'Christmas Wishes' clear set
CS: SU! Baja Breeze, Old Olive & Very Vanilla

Patterned paper:  Echo Park Winter Wishes 'Icy Chevron'
Ink: SU! Old Olive & Perfect Plum
Tools: SU! Holiday Collection Framelits die set, Spellbinder's Labels Trio die, Memory Box Chadwick Label die, SU! Dotted Scallop Ribbon Border punch, sponge dauber
Embellishments & accessories: SU! Old Olive grosgrain ribbon, Star Dust Stickles, holographic sequins, SU! Rhinestone Jewels, Dimensionals


Photobucket

Thursday 20 December 2012

Robin Just For You Money Holder Card With Crimped Pouch

I bought our friend Alan a couple of little gifts that I've wrapped up but I also wanted to give him some money so he can choose something for himself.  I've made a 12 cms square card with a pocket inside so I have somewhere to tuck a bank note. 

I bought the 'Christmas Robins' set a while back but hadn't used it yet and I decided it was high time I inked up the podgy robin from the set.  I stamped with VersaMark ink and heat embossed with Early Espresso embossing powder.  I stamped on different coloured CS and paper pieced the robin.  I added Star Dust Stickles to the hat and used glittered dome stickers for the hat pom pom and the mistletoe berries.  After stamping the 'just for you' I popped up the robin and added small black gems for his eyes.


Here's the inside with the pocket, a sentiment label and some popped up holly leaves.  I used red Stickles for the berries.


Here's the crimped pouch that holds the money holder card.  The pouch was made from an envelope for a 5" x 7" card.  You seal the envelope, cut off the top and then run the larger envelope piece through the crimper - making sure you have the open side at the side as it goes through the crimper.  This ensures that the envelope shrinks widthwise which means the smaller piece can fit over the top of it as a lid for the pouch.  Rounding the corners of the large crimped piece helps the lid fit on better too!  I die cut a label and sponged the edges with Riding Hood Red ink.  I then stamped and fussy cut holly, popped the leaves up and added red pearls as berries.


Supplies:
Stamps: Hobby Art 'Christmas Robins' clear set, 'just for you' from SU! Precious Butterflies set, holly from Woodware 'Christmas Date' clear stamp, 'Merry Christmas' from SU! Wacky Wishes set
CS: SU! Riding Hood Red, Lucky Limeade, Chocolate Chip & Whisper White
Ink: VersaMark & SU! Riding Hood Red, Lucky Limeade & Chocolate Chip
Tools: SU! Apothecary Accents Framelits die, paper crimper, 3/4" circle punch, corner rounder punch, sponge daubers
Embellishments & accessories: Star Dust & Xmas Red Stickles, red pearls, glittered dome stickers, 3D foam tape


Photobucket

Wednesday 19 December 2012

Gill's Mincemeat Jar

I had lunch with my friend Gill a couple of weeks ago and we were talking about Christmas food and the subject of mincemeat came up.  I told Gill I'd be making a batch of home made mincemeat and I asked her if she would like a jar.  She said yes - but then went on to say she doesn't like currants!  I've always faithfully followed Delia Smith's recipe which definitely includes currants.  This year I omitted them and just increased the amount of sultanas and raisins to keep my friend happy! 

I decided to make a topper for the jar lid.  I was chuffed I got to use my 'Deliciously Made for You' stamp from the SU! 'Creatively Yours' set!  I stamped that in Real Red ink, added some Baja Breeze snowflakes and punched the circle out.  I sponged the edges with Real Red ink and layered onto a larger Baja Breeze circle which I popped up on top of the Real Red doily.  I added 3 punched snowflakes and placed jewels in the centre.


Here's a closer look at the topper.  I saw Gill today and gave her the jar and she said the mincemeat looked lovely and she was impressed that I'd left out the currants!  No doubt I'll get a review when she's actually tasted it! 


Supplies:
Stamps: SU! Creatively Yours set, PSX Snowflake Medley
CS: SU! Real Red, Baja Breeze & Whisper White
Ink: SU! Real Red & Baja Breeze

Tools: SU! Delicate Doilies Large Sizzlits die, circle punches, Fiskars snowflake punch, sponge dauber
Embellishments & accessories: rhinestone jewels, 3D foam pads


Photobucket

Tuesday 18 December 2012

Holly Perch Christmas Cheer Card

This is the Christmas card I've made for Alan to give to Jan this year.  I've been eyeing up this 'Holly Perch' stamp set for a while and finally succumbed! I decided to go for paper piecing with some Stickles for festive sparkle.

The Chocolate Chip card base measures 5 3/4" square and I used Riding Hood Red CS and Echo Park Green Flourish paper for layering mats.  I inked the stamp with VersaMark and embossed the image with Early Espresso embossing powder.  I stamped and embossed a few times in order to get my coloured piecing bits and some extra holly sprigs.  I used Close to Cocoa and Chocolate Chip textured CS for the bird body and wing.  I used red paper for the bird's breast and the bauble and the same green paper I used for the mat layer for the holly leaves and the band on the bauble.  I die cut the image with a Petite Oval die, matted onto a larger Choc Chip textured CS oval and adhered that to the panel after adding the Choc Chip ribbon strip.  After cutting out the holly, bird and bauble I added red Stickles to the holly berries and gold Stickles to the bauble band.  Once the glitter glue had dried I popped them all up and added a ribbon bow.  I stamped the sentiment, die cut the banner shape and popped up the holly sprig.  Some chocolate brown pearls finished off the front.


For inside, I cut a vanilla panel, layered that onto a Riding Hood Red mat and stamped the sentiment.  I then popped up a couple of holly sprigs.


The 'Holly Perch' set comes with a vertical 'Happy Christmas' sentiment and I stamped that on the envelope, added some patterned paper, Riding Hood Red CS strips and popped up more fussy cut and glittered holly sprigs.  I was happy how this card turned out, I really hope Alan and Jan like it!


Supplies:
Stamps: Woodware 'Holly Perch' & 'Happiest of Christmases' clear sets, 'Christmas Cheer' from SU! 'Sweet Essentials' set
CS: SU! Chocolate Chip, Riding Hood Red & Very Vanilla, SU! Close to Cocoa & Chocolate Chip textured CS

Patterned paper:  Echo Park Style Essentials 'Green Flourish' & Bo Bunny ?? Double Dot
Ink: VersaMark & SU! Chocolate Chip
Tools: Petite Oval Nestabilities dies, MFT Fishtail Flags Stax die
Embellishments & accessories: SU! Early Espresso Stampin' Emboss powder, SU! Chocolate Chip grosgrain ribbon, Gold & Xmas Red Stickles, chocolate brown pearls, 3D foam pads


Photobucket

Saturday 15 December 2012

Crackers Christmas Cheer Card - 52 {C}CT Dec Theme Challenge

We have a fun theme challenge over at 52 {C}CT this week - Christmas crackers!  Crackers are such a traditional part of a British Christmas but maybe that's not so for other parts of the world.  As crackers usually contain a toy, hat and joke you could interpret the challenge by using any one of those elements in your card.

The jokes are often terrible, the hats are ginormous, flimsy and garish and the gifts may well be naff - but I still firmly believe a Christmas dinner table is not complete without crackers!  We went out to a restaurant for a Christmas meal with some friends last Saturday night and we all  had crackers by our plates.  I was delighted with the gift inside my cracker - a giant silver coloured paperclip - I know I can do something crafty with that! 

Anyway, onto my card.  To make the crackers on my card I have used a Sizzix Sizzlits die that I have had for years - it came in a Christmas themed set and I don't think I've used the crackers die 'til now!  I die cut 6 crackers using two patterned papers and then I added glitter CS strips and tiny punched snowflakes to decorate them.  I die cut 6 more CS crackers and glued them behind the patterned paper ones so they're more sturdy.  I popped up the crackers onto an Old Olive panel and layered that onto Cherry Cobbler CS and Champagne Glimmer Paper mats.  I stamped the sentiment in gold pigment ink and heat embossed with Jeweled Gold embossing powder so it's very sparkly.  I cut out the sentiment with a label die and added 3 gold glitter snowflakes to finish off the front.


I stamped another sentiment inside, added some of the holly paper, a gold glitter strip and a snowflake.  I punched holly for the envelope flap and added red glitter berries. 


Well, that's it from us at 52 {C}CT for 2012, this is our last challenge of the year and I hope you'll be able to grab some creative time amongst all the festive preparations and play along with us.  We would love to see you back on 5th January for the start of the 2013 Christmas card journey!  I'm already excited as January is my month to host the challenges!  I hope you'll come along to see what I've got lined up for you and I'll be chuffed to bits if you play along!

Supplies:
Stamps: SU! Sweet Essentials set, Hero Arts 'Very Merry Christmas' clear set
CS: SU! Old Olive, Cherry Cobbler, Very Vanilla & Champagne Glimmer Paper

Patterned paper:  Basic Grey Fruitcake & Bo Bunny red dotty
Ink: SU! Cherry Cobbler, Encore gold pigment ink
Tools: Sizzix Crackers Sizzlits die, Spellbinder's Labels Trio die, Woodware tiny snowflake punch, Martha Stewart Holly Branch punch
Embellishments & accessories: Stamp 'n Stuff Jeweled Gold embossing powder, SU! Rhinestone Jewels, Dimensionals


Photobucket

Friday 14 December 2012

Simple Snowflakes Square Card

This is just a little card I designed to pop into my customer's bags to thank them for their SU! orders.  I've used SU! Naturals White CS for the card base.  I love SU! Whisper White CS for stamping on but am reluctant to use it for card bases as I prefer something sturdier.  I thought I'd give the Naturals White CS a try - and I like it!

I used the Four Seasons hostess set, stamping the circle of snowflakes in Island Indigo ink and the centre snowflake in Real Red.  Simple mat layers and circle punches meant this card came together really quickly.  I popped up the red snowflake circle.  I placed a snowflake circle on the inside of the card as well - just the same as the one on the envelope flap.  To finish off I dotted some jewels on a few of the snowflakes.  


I don't know about you but my To Do lists are getting longer and not many items are getting crossed off!  All this Christmassy stuff is interfering with my crafting time, hmph!  Hubby is at work tonight and I plan on pulling on my PJs and getting inky and will go back to more Christmas chores another time!

Supplies:
Stamps: SU! Four Seasons & Embellished Events sets
CS: SU! Naturals White, Real Red & Island Indigo
Ink: SU! Real Red & Island Indigo
Tools: SU! 1", 1 1/4" & 2 1/2" circle punches
Embellishments & accessories: SU! Rhinestone Jewels, Dimensionals 


Photobucket


Wednesday 12 December 2012

Hearts 1st Wedding Anniversary Card

Last year my friend Kath asked me to make a wedding card that she could give to her son and his partner and here is the card I made.  This year Kath has asked for a 1st Wedding Anniversary card for David and Marie.  I knew I wanted to keep to red, white and gold and to have a hearts theme.  Huge thanks to my very kind SU! upline Joanne who lent me her I Heart Hearts stamp set.  Lots of lovely hearts to play with in that set!

I made a Cherry Cobbler 5 3/4" card base and the mat layers were made with Whisper White CS and Champagne Glimmer Paper.  I generated the sentiment on the computer using the Nuptial BT font and the RGB colour code for Cherry Cobbler.  Before attaching the layers to the card I added some Cherry Cobbler dotted ribbon.  I stamped all the hearts in Cherry Cobbler ink and cut them out.  I popped three of the hearts up on Dimensionals and added a few jewels. 


I cut a Whisper White panel for inside the card, stamped the sentiment "Wishing you lots of everything wonderful" and added two gold glitter punched hearts.  I then stamped two champagne glasses in gold pigment ink and heat embossed with Jeweled Gold powder - ooooh, very sparkly!  I stamped one glass direct to the panel and stamped another on a separate piece of CS, cut it out and popped it up.  I added a Cherry Cobbler punched heart and a few jewels.  I found some square gold envelopes in my stash recently and I thought this occasion warranted a posh envelope!  Punched shapes from the SU! Heart to Heart punch were adhered to a white circle which was layered onto a larger Cherry Cobbler circle.  Kath said the card was lovely and I hope the happy couple like it too!


Supplies:
Stamps: SU! I Heart Hearts set, Hero Arts Everything Wonderful
CS: SU! Cherry Cobbler, Whisper White & Champagne Glimmer Paper
Ink: SU! Cherry Cobbler, Encore Gold pigment ink
Tools: SU! Heart to Heart punch, circle punches
Embellishments & accessories: Stamp 'n Stuff Jeweled Gold EP, SU! Cherry Cobbler scallop dot ribbon, Rhinestone Jewels, Dimensionals


Photobucket

Monday 10 December 2012

You MUST Look At What Lesley Made!

This is the fabulous and festive exploding box Christmas card Lesley gave me at card group.


Here's a closer look at the lid.


Here's the wonderful sight that greets you when you take the lid off! 


Each of the four green pockets holds a tag.


Here is a close up of the sweet scene in the centre.  A deer family, tree, chocolate snowman, snowballs - and just look at those itty bitty wrapped and decorated gifts!


Absolutely AMAZING isn't it?!  Can you imagine the time, effort and tremendous patience that went into it? Guess what - Lesley made an exploding box for everyone at card group - that's TEN of these!  TEN!    * faints at the thought *  I'd have lost the will to live halfway through the first one!  Plus she's made more for family and friends!

I know Lesley looks at my blog - she's lovely, a real sweetheart and she'll be embarrassed that I've showcased her talent here!  But I feel something as fabulous as this needs to be shared!

Lesley,

Photobucket

heartfelt thanks for this beautiful creation, I will treasure it always!  We had guests at our home on Saturday night and they were all blown away by it!  Ruth x


Saturday 8 December 2012

White Embossed Tree Season's Greetings Card - 52 {C}CT Dec Colour Challenge

This week at 52 {C}CT we have a fabulous colour challenge for you - black, white and a metallic of your choice.


I went for silver as my metallic and I've used silver brads and the gorgeous, sparkly SU! silver Glimmer Paper - I LOVE that stuff!  I inked the tree with VersaMark and then heat embossed after sprinkling on white embossing powder.  The sentiment is also white embossed.  After cutting the tree panel to the size I wanted I used a ruler and an SU! silver Dazzle Marker to edge the panel with silver.  I then layered that onto a slightly larger black mat.  I attached the tree panel and the sentiment label to a silver sparkly mat with silver brads and attached the mat to a black A6 size card base.  I punched a sparkly snowflake, attached that to a black circle with a brad, layered onto a larger white CS circle and popped it up.  


I white embossed a sentiment for inside the card and cut it out with an SU! Labels Framelits die and adhered it to a panel of white CS.  To finish off inside I added a trio of small sparkly punched snowflakes.  For the envelope flap I punched black and sparkly silver circles and added more punched small snowflakes.


I hope you will join in with our colour challenge this week, I look forward to seeing what you create!

Supplies:
Stamps: Hero Arts 'Branch & Flourish Tree', SU! 'Four the Holidays' set, Stampendous 'Snow Brackets'
CS: SU! Basic Black, Whisper White & Silver Glimmer Paper
Ink: VersaMark, SU!  silver Stampin' Dazzle Marker
Tools: circle punches, Spellbinder's Labels Trio die, SU! Labels Framelits die, X Cut snowflake punch, Fiskars snowflake punch, paper piercer
Embellishments & accessories: white embossing powder, silver brads, SU! Dimensionals 


Photobucket

Friday 7 December 2012

December 2012 Card Group Projects

Yesterday was the last card group get together of 2012.  A very merry time was had - crafting, Christmas card swapping, Secret Santa gift giving and food made for a most enjoyable afternoon!  I designed one very simple card and then two little gifts for everyone to make.

The ladies wanted to have a go at making rosettes so I designed this card using the largest of the rosettes from the Tim Holtz Mini Rosettes die.  Thank you cards can come in useful after Christmas so I made this a thanks card although I took other sentiments so the ladies could choose what occasion to use the card for.  I stamped the flourish in Certainly Celery ink and the sentiment in Riding Hood Red ink.  I used paper from the SU! Candlelight DSP pack to make the rosette.  I threaded a Real Red CS strip through a Certainly Celery button and popped that on the centre of the rosette.  I took my handy dandy Imaginisce I Bond cordless hot glue gun as I find that the quickest and best way to assemble rosettes and it's also great for gluing embellishments like buttons.  Crystal Effects or Glossy Accents work well too if a hot glue gun isn't an option.


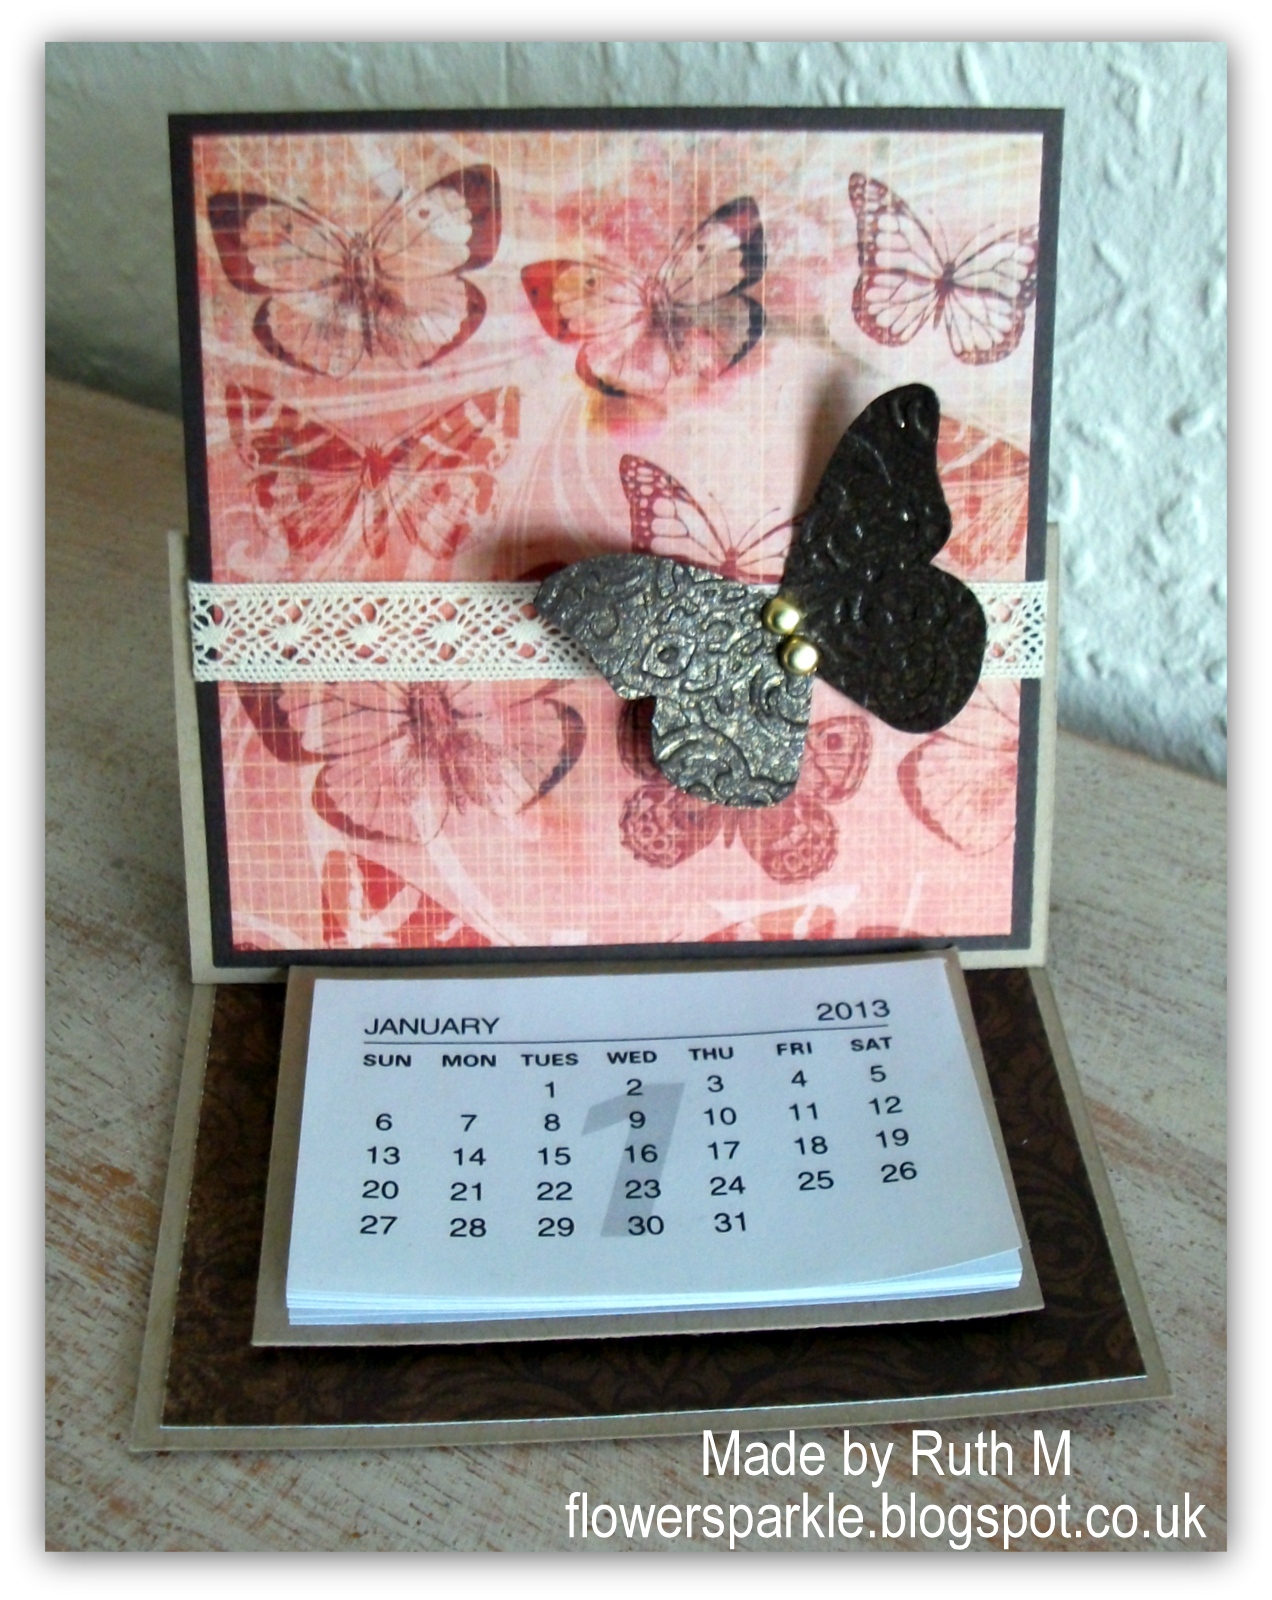
Here's the easel calendar holder that was our next project.  The finished size is 4" x 4" so I cut Crumb Cake CS 8" x 4" and scored at 2" and 4" to form the easel.  The butterfly paper was adhered to an Early Espresso CS square and the strip of SU! 'Chantilly' lace ribbon was added with the ends taped to the back.  At this point at card group Lesley and I entertained everyone by singing a rousing rendition of that rock 'n roll classic 'Chantilly Lace'!  We do like a good sing song!  Then the die cut butterfly was embossed with the Lacy Brocade folder and spritzed with gold Perfect Pearls mist.  Two gold brads fixed the butterfly to the panel and then the panel was glued to the easel front.  Damask paper was adhered to the bottom of the card.  I glued the calendar to a rectangle of Crumb Cake CS and popped that up as the easel stop.  I think these calendars make great stocking stuffers or little gifts for Christmas.


The last project is a hot chocolate/candy cane sleeve.  I bought sachets of Maltesers hot chocolate and candy canes and before assembling the sleeve I tied the cane to the sachet with red ribbon.


To make the sleeve I cut A4 Chocolate Chip CS in half, trimmed it to 7" long and on the long side scored at 1 7/8", 2 1/2", 4 1/2" and 5 1/8".  I used double sided tape to glue the sleeve together.  I embossed a strip of Gumball Green Core'dinations CS with a border folder from the Delicate Designs set and scuffed the embossing with fine sandpaper.  I stamped and die cut the mug and steam - I inked the mug in Real Red ink and used a blender pen to remove the red ink from the drink portion and then added colour for the hot chocolate with a Chocolate Chip marker.  I cut a slit in the mug, slid the steam in the slit, taped it at the back to keep it in place and popped the mug up.  The sentiment element was stamped and punched and the 'For You' and the Chocolate Chip circles were both popped up.

Then I slid the sachet and cane inside the sleeve and hooked the cane over the top so the contents didn't fall out.  Well, OK, that was the theory but when I demoed this to the group I picked it up and of course the sachet fell out!  Much hilarity at my expense ensued - but I tightened the ribbon which put the issue right!  I threatened them with being put on the naughty list which would mean no Secret Santa gifts - but they're such a fab group of ladies I let them off!


Supplies for thanks card:
Stamps: Hero Arts 'Flourish', SU! Thank You Kindly set
CS: PaperMania cream A6 card blank

Patterned paper:  SU! Candlelight DSP
Ink: SU! Certainly Celery, & Riding Hood Red
Tools: Sizzix Tim Holtz Mini Rosettes die, 1" circle punch (circle glued to back of rosette), Imaginisce I Bond cordless hot glue gun
Embellishments & accessories: SU! Certainly Celery button


Supplies for easel calendar:
Stamps: none
CS: SU! Crumb Cake & Early Espresso

Patterned paper: Kaisercraft 'With Love' from Sweet Nothings collection, Echo Park Style Essentials 'Brown Damask'
Ink: none
Tools: SU! Simply Scored, Beautiful Butterflies Bigz die, Lacy Brocade embossing folder
Embellishments & accessories: Anita's 2013 calendars, SU! 'Chantilly' lace ribbon, Perfect Pearls 'Heirloom Gold' mist, gold brads, 3D foam tape


Supplies for hot chocolate sleeve:
Stamps: SU! Scentsational Season & Mixed Medley sets
CS: SU! Chocolate Chip, Whisper White & Gumball Green Core'dinations CS
Ink: SU! Real Red, Gumball Green, Chocolate Chip & blender pen
Tools: SU! Holiday Collection Framelits dies, Simply Scored, 3/4" & 1 3/8" plain circle punches, 1 1/4" scalloped circle punch
Embellishments & accessories: red grosgrain ribbon, 3D foam pads


Photobucket

Tuesday 4 December 2012

Blue Snowman Merry Christmas Card

A few weeks ago this sketch was the challenge at the 52 {C}CT blog and I started making this card then.


Choosing my patterned paper, stamping the snowman and die cutting the ovals was as far as I got but then I abandoned it and made a different card.  I placed the bits in my 'to be completed' box and I have now dug them out and finished the card.  I loved the unusual colour of the snowflake patterned paper when I saw it and it goes beautifully with SU! Not Quite Navy CS.  I've added Crumb Cake and Very Vanilla into the mix also.

I embossed the Crumb Cake CS with the Northern Flurry embossing folder, went over the embossed areas with Whisper White Craft ink and sponged the edges of the panel.  I popped up the oval, added a sentiment panel and 3 punched snowflakes with gem centres to finish the front.


Here's the inside with more of the lovely paper, a sentiment and a punched snowflake element.


I embossed the envelope flap with the Northern Flurry embossing folder.  I debated whether to leave it as it was or sponge on some ink.  The 'when in doubt - don't!' mentality won out and I left it plain!


Supplies:
Stamps: Inkadinkado Snowman, SU! Seasonal Wishes set, Hero Arts 'Very Merry Christmas' clear set
CS: SU! Not Quite navy, Crumb Cake & Very Vanilla

Patterned paper:  Bo Bunny Snow Day Flurries
Ink: SU! Not Quite Navy & Crumb Cake, SU! Whisper White Craft ink
Tools:  Petite Ovals Nestabilities dies, SU! Northern Flurry embossing folder, snowflake punches, sponge daubers
Embellishments & accessories: SU! Rhinestone Jewels, 3D foam tape


Photobucket

Saturday 1 December 2012

Santa's Outfit Card - 52 {C}CT Nov Sketch Challenge

It's time for the last sketch of 2012 at 52 {C}CT this week.  It's a nice, easy, versatile sketch too!


I chose to rotate the sketch for my Santa's outfit card. I've had the Hero Arts Santa stamps for a very, very long time and I've used them a lot over the years, just not recently.  I can't bring myself to part with them though and it was lovely to ink them up again!  I started off by making a 5 3/4" square Riding Hood Red card base.  I stamped the coat, hat and boots onto watercolour paper and coloured the coat and hat with inks and a wet paintbrush.  I used a gold gel pen to colour the belt buckle.  I cut out the images and then I made the trim on the clothes and boots fluffy by adding white Flower Soft.  I thought this sentiment containing the 'Ho, ho, ho!' was very suitable to use with the Santa outfit images!  I used gold and black CS for my mat layers.  I added some gingham ribbon and popped up the images to finish off the front.


I stamped another sentiment inside the card.  I've then used another 'oldie but goodie' item I've had in my stash for ages - an Ellison Cut'n Emboss snowflake die.  I cut the flakes from gold CS and placed a red glitter dome sticker on each centre.  


I hope you'll join us for this week's challenge - you just might need a few more Christmas cards yet!  I look forward to visiting you to see what you create with this fab sketch layout!

Supplies:
Stamps: Hero Arts 'Santa's Coat', 'Santa's Hat', 'Santa's Boots' & 'Think of Christmas', Penny Black 'Joy, Hope'
CS: SU! Riding Hood Red, Basic Black & Whisper White, gold CS
Ink: VersaFine Onyx Black, SU! Riding Hood Red & Basic Black, gold gel pen
Tools: Ellison Cut'n Emboss Snowflake die, Stamp-a-ma-jig, Perfect Layers
Embellishments & accessories: Polar White Flower Soft, black & white gingham ribbon, PaperMania red glitter dome stickers, SU! Dimensionals


Photobucket
01 09 10