Wednesday 30 October 2013

Rosehip Wreath Merry Christmas Gift Box - Inkspirational Oct Photo Challenge

Although I am no longer on the Design Team at Inkspirational I want to take part in the challenges if and when I can, it'll be nice to stay in touch!  I checked out the current Inkspirational challenge and really liked the inspiration photo.


I have some new crafty goodies that I hadn't used and I knew this would give me the perfect opportunity to use my rosehip wreath stamp, a Kraft gift box and some new patterned paper.  I love the SU! Kraft gift boxes, they're a great size, really sturdy and come all ready to decorate and assemble - so easy!  I inked the wreath with VersaMark, heat embossed with Early Espresso powder and fussy cut the image.  I coloured the rosehips using a blender pen with Real Red ink and I then added Glossy Accents to make them raised and shiny.  While that was drying I cut the patterned paper pieces, glued those to the sides and I cut a Real Red square to go on the top of the box.  I dry embossed it with a folder and glued that in place.  I adhered Real Red CS all around the sides of the box and then added a strip of brown gingham ribbon.  I tied a bow separately and attached that with a glue dot.  I stamped and die cut the sentiment and then popped up the wreath and one end of the flag banner.


Here's a different angle.


Here's a close up of the shiny rosehips.


Supplies:
Stamps: Woodware 'Rosehip Wreath' clear stamp, Elzybells 'Merry Christmas'
CS:  SU! Kraft Gift Box, SU! Real Red & Very Vanilla

Patterned paper:  Kaisercraft Christmas Carol 'The First Noel'
Ink: SU! Real Red & Early Espresso, VersaMark, blender pen
Tools: Sizzix 'Starry Night' embossing folder, MFT Fishtail Flags Stax die, heat tool
Embellishments & accessories:  SU! Early Espresso embossing powder, Ranger Glossy Accents, brown & white gingham ribbon, SU! Dimensionals


 photo ruth_catgrin.gif 

Monday 28 October 2013

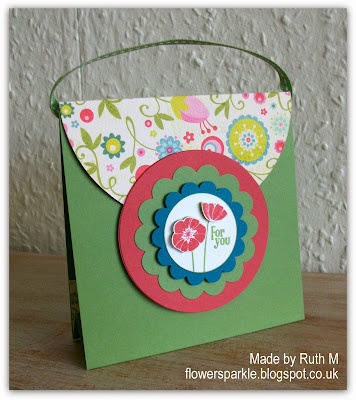
Flowers For You Handbag Pocket Card - CAS Colours & Sketches Sketch #48

Over the weekend I visited Jacqueline's, Louise's, and Patricia's blogs to see the Christmas cards they'd made for this week's 52 {C}CT challenge.  On each visit I came across the fab cards they'd made using the wonderful sketch that forms the current challenge at CAS Colours & Sketches.  As soon as I saw it I loved it and knew I'd have to take part in the challenge.  I thought if you rotate the layout it looks like a handbag - well, it does to me anyway!


So that's what I did - I rotated the sketch and made a 4 1/4" square handbag shaped pocket card.  I cut Wild Wasabi CS to measure 4 1/4" x 10 1/2" and scored at 4 1/4", 5 1/4" and 6 1/4".  I cut a 4 1/4" circle of patterned paper, folded and scored it in half, added ribbon as a bag handle and glued it to the back of the card.  I then stamped the 'For You' flowers stamp twice, once in Wild Wasabi and the second time in Primrose Petals.  I punched out the image, matted onto an Island Indigo scalloped circle, popped that up onto a larger Wasabi scalloped circle and added that to a Primrose Petals plain circle.  I fussy cut the flower heads and popped them up.  I used self adhesive magnetic snap closures  to keep the flap closed. 


Here's a side view of the card. 


Here's the card opened.  The strip of patterned paper is only taped at the bottom and sides so it forms a pocket so a gift card or money can be included with the card.


After I'd finished the card I realised I hadn't got an envelope the right size for the card to fit into.  My trusty Simply Scored was already out on the desk so I grabbed the Diagonal Plate and whipped up a 4 3/4" square envelope made with Primrose Petals CS.  I added a patterned paper strip and a stamped and punched label to the front.  Here's the card and envelope together, quite cheery I think!  Thanks so much to Jacqueline, Louise and Patricia for their fab inspiration, I had a very happy time putting this card together!


Supplies:
Stamps:  SU! 'Punch Bunch' & 'Four Frames' sets
CS: SU! Wild Wasabi, Primrose Petals, Island Indigo & Whisper White

Patterned paper:  My Mind's Eye Mary Mary 'Beautiful' 
Ink: SU! Wild Wasabi & Primrose Petals
Tools: SU! Simply Scored & Diagonal Plate, SU! plain & scalloped circle punches, SU! Decorative Label punch, EK Success Circle Scissor Pro
Embellishments & accessories: SU! Wild Wasabi stitched ribbon, Basic Grey magnetic snap closures, SU! Dimensionals


 photo DragonflyRuth.gif

Saturday 26 October 2013

Two Snowman Fancy Fold Cards - 52 {C}CT Oct Technique Challenge

Danielle has done a wonderful job as the 52 {C}CT October challenge hostess, I have loved all her choices - and she's finishing off the month with a really fun technique challenge which is right up my street - Fancy Fold Cards.  I enjoy them muchly, in fact I've made two cards for this challenge!


First I made a shadow box card.  I have a tutorial for making a shadow box card on this page HERE.  I thought it would be fun to have the viewpoint on my card as if you're inside the house looking through the window into the garden.  That gave me the perfect chance to ink up Bertie - a newly acquired snowman stamp!  I had a real blast making this card but it wasn't a quick card, I worked on it over several days doing a bit at a time - definitely a "work in progress" card!  Definitely a card that will go into the "Special Cards" box too, I already know which friends will receive this at Christmas!

Here's the finished card.  It measures 5 3/4" square.


Here's what I worked on first - the back of the shadow box card.  I stamped Bertie twice on watercolour paper and once on thin paper.  I cut out the image from the thin paper to make a mask of the snowman and fence and adhered the mask over the top of the watercolour paper panel with temporary adhesive.  I then sponged Soft Sky and Marina Mist inks onto the panel, removed the mask, coloured the fence and the twiggy arms.  I spritzed water onto my hand, flicked it onto the panel and dabbed with a piece of kitchen paper to get a snowy look.  I then coloured the second image I'd stamped onto watercolour paper and fussy cut just the snowman part out.  I used inks and a blender pen to add colour to the images.  I added glitter glue to the fence, hat and nose and added Glossy Accents to the buttons.  When all that was dry I popped Bertie up.  I stamped the podgy robin, coloured, fussy cut and popped him up.


Here's a closer look at Bertie.


Next I worked on the front part of the shadow box card.  I adhered patterned paper as wallpaper to the front and cut out a rectangular aperture with a Nestie die.  I die cut the window from white linen textured CS, taped acetate behind as glass and popped the window up.  I stamped and fussy cut the hanging stars, added yellow glitter glue and glued those to the window.  I then die cut the curtain - it's a theatre curtain die which means the curtains are a bit short for the window.  So, I cut another curtain shape, did some snipping so I ended up with two pieces and I glued those underneath to make the curtains look layered and longer.  I die cut from Core'dinations CS and scuffed the embossing with sandpaper so that the curtain detailing shows up.  Then I added ribbon tie backs to the curtains. 


Then I worked on the back of the card, adding patterned paper, a sentiment and a stocking hanging from a holly garland.  Again, I got the glitter glue out to add some sparkle to the berries and stocking.


Then it was time for the envelope to be decorated.  I covered the flap with the red damask paper and popped up stamped, coloured, fussy cut holly onto punched circles.


Here's the finished card again so I can point out the final detail that I added before calling the card done - I popped up two Christmas presents underneath the window.  I added gold lurex thread to the smaller present and a die cut bow with a gem centre to the larger present.   


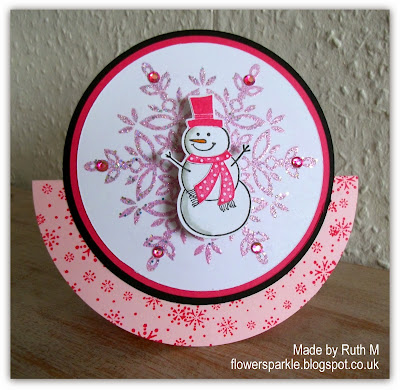
My second card is a rocker card.  I saw this fab rocker card made by Helen last week and I wanted to make one as I've not tried it before.  I know Danielle loves pink Christmas cards, bling and snowmen - so Danielle, this one's just for you!

For the rocker card base I cut a 5 3/4" Pink Pirouette circle, folded it in half and stamped the front with Melon Mambo snowflakes.  I heat embossed the large snowflake with Vintage Pink tinsel embossing powder, stamped and die cut the snowman and he's popped up on a wobble spring.  I added iridescent pink gems to the snowflake to finish the card front.


Here's the inside with a sentiment layered over a stamped snowflake.  There's no decorated envelope - yet - as I ran out of time but I'll get to that soon!


 So you've seen what I created, now it's your turn to make a fancy fold Christmas card and link it up at 52 {C}CT!  I'm looking forward to seeing what you come up with!
 
Supplies for shadow box card:
Stamps:  Hobby Art 'Bertie the Snowman' cling stamp, Hobby Art 'Christmas Robins' clear set, sentiment from Stampendous, Dovecraft 'Holly' clear stamp
CS: SU! Cherry Cobbler, Woodware white linen textured CS, Amazon Core'dinations CS, watercolour paper, acetate

Patterned paper:  Echo Park Very Merry Christmas, SU! 'Festival of Prints' DSP stack
Ink: VersaFine Onyx Black, SU! Soft Sky, Marina Mist, Cherry Cobbler, Early Espresso, Pumpkin Pie, Soft Suede, Cajun Craze & Old Olive, Blender Pen
Tools: Poppystamps 'Grand Madison Window' die, rectangle Nestabilities die, Joy Crafts 'Theatre Curtain' die, Memory Box 'Tiny Bow' die, square punch, plain & scalloped circle punches, SU! Simply Scored
Embellishments & accessories:  Star Dust, Orange Peel & Yellow Stickles, SU! Cherry Cobbler Dazzling Details, SU! Early Espresso taffeta ribbon, Ranger Glossy Accents,  gold lurex thread, red crystal, Dimensionals, fine sandpaper


Supplies for rocker card:
Stamps: Hero Arts/Sizzix 'Snowman' stamp & die combo set, Hero Arts 'Falling Snowflakes', SU! 'Festive Flurry' & 'Best Yet' sets
CS: SU! Pink Pirouette, Melon Mambo, Basic Black & Whisper White
Ink: VersaMark, SU! Pink Pirouette & Melon Mambo, VersaFine Onyx Black, SU! Pumpkin Pie & Sahara Sand markers
Tools:  EK Success Circle Scissor Pro, die from Hero Arts/Sizzix 'Snowman' stamp & die combo set, heat tool

Embellishments & accessories: Stampendous Vintage Pink tinsel embossing powder, Action Wobble Spring, PaperMania iridescent pink gems


 photo FlowerRuth.gif 


Wednesday 23 October 2013

Dangly Ornament Tent Card

I was very happy how this dangly snowflake tent card turned out.  I thought I'd try a similar card but this time with a dangly ornament instead of a snowflake.  I made the A6 sized card base with Pool Party CS, used circle dies to cut out the aperture and frame and adhered Winter Frost DSP to the back panel.  I stamped and die cut two Island Indigo ornaments, pressed one onto my VersaMark pad, sprinkled Iridescent Ice embossing powder over it and heat embossed.  I sandwiched silver ribbon between the two ornaments with Dimensionals and taped the ribbon ends behind the aperture.

The sentiment is from the SU! Teeny Tiny Sentiments set - but it isn't teeny 'cos I printed it from My Digital Studio (MDS) and so was able to enlarge the size!  MDS is so easy to use and I'm chuffed that the software came with stamp sets that I don't own in rubber format - like Teeny Tiny Wishes.  It's fab that I can choose colours and sizes for my images and sentiments too.  I finished off the front with a silver ribbon bow and rhinestones.  


Here's a closer look at the sparkly ornament.  I LOVE that particular ornament stamp, it's so gorgeous and elegant!


Here's the back of the card and the envelope.  Again I used MDS to generate the sentiment, using a beautiful greeting from the Delightful Dozen set - another set I don't own in rubber format but which was included in the software.  I added the ornament from the Something for Christmas set so it hangs from the swirl - perfect placement without the need for a Stamp-a-Ma-Jig!  A fab feature within MDS is the drop shadow - I added that to the sentiment and loved the end result.  A simple stamped and die cut ornament on the envelope flap completed the card. 


Supplies:
Stamps:  SU! 'Ornament Keepsakes' set, SU! 'Teeny Tiny Wishes', 'Delightful Dozen' & 'Something for Christmas'  MDS stamp brush sets
CS: SU! Pool Party, Island Indigo & Whisper White

Patterned paper:  SU! 'Winter Frost' DSP
Ink:  SU! Island Indigo, VersaMark
Tools:  Circle Nestabilities dies, SU! 'Holiday Ornaments' Framelits dies, SU! Simply Scored
Embellishments & accessories: SU! 1/8" silver ribbon, rhinestone jewels, Dimensionals


 photo DiamanteHeartsRuth.gif

Monday 21 October 2013

Bauble Christmas Wishes Card - HOC Oct Sketch Challenge (Classic & Elegant)

During October we have a great sketch layout at House of Cards that we'd like you to use for your challenge entries.  You can rotate the sketch and use different shapes, as long as the layout comes through to us in your finished card it's all good!  This week we want to see CLASSIC & ELEGANT style cards.


I've already made a card using the layout for the Cute & Fun cards week, that time I made a square card (see the blog post by clicking HERE.)  This time I've made an A6 rectangle card and I changed the central shape to a circle.  I love a versatile layout that works well with square or rectangular cards!

I recently bought a lovely PaperMania Christmas stamp set.  On a recent trip to my local craft shop, the Glitter Pot, I found a pack of red, grey and white patterned papers that match the stamp set - fab!  I started by cutting the papers, adding the Basic Gray diagonal strips and layering onto a Basic Gray mat.  I glued the mat to a Riding Hood Red card base.    I stamped a bauble and hanger and then stamped another bauble.  I fussy cut that, popped it up, also popped up the Basic Gray circle and I added rhinestones to the bauble.  I cut the 'Christmas Wishes' from a piece of patterned paper, layered that onto a Basic Gray Word Window punched shape, added rhinestones and popped it up.


I used more of the patterned papers to decorate the inside of the card and the envelope flap.


The other Classic & Elegant DT members will have made wonderful cards to inspire you so do check them out and then please play along with us at HOC this week and make a Classic & Elegant style card using the layout!  Everyone is welcome at our House!

Supplies:
Stamps: PaperMania Home for Christmas 'Baubles' set, Hero Arts 'Very Merry Christmas' clear set
CS: SU! Riding Hood Red, Basic Gray & Whisper White

Patterned paper:  PaperMania 'Home for Christmas' paper pack
Ink: SU! Riding Hood Red & Basic Gray
Tools: circle Nestabilities dies, SU! Word Window, 1" circle & 1 1/4" circle punches

Embellishments & accessories: SU! rhinestone jewels, Dimensionals 

 photo CardFuchsiaRuth.gif 

Saturday 19 October 2013

Snowflake Tree Merry Christmas Card - 52 {C}CT Oct Bling Challenge

This week at 52 {C}CT Danielle is asking us to 'Bling It Up!' as this week's challenge - a bit of seasonal sparkle never goes amiss in my book!


I took the opportunity to use a newly acquired stamp set.  I loved the SU! 'Season of Friendship' set as soon as I saw it years ago and it has been on my wish list for a long time.  I finally got a set from eBay.com, it arrived a few days ago and I couldn't wait to ink it up.  I stamped the tree in black, the bird in Real Red and the snowflakes in Smoky Slate.   SU! Red Glimmer Paper is very blingy so I layered onto a larger square of that and then layered onto a Basic Black mat.  I adhered the layers to a 5 1/4" square white card base.  I stamped, matted and layered the sentiment and die cut two black scalloped photo corners.  I then had great fun blinging my card up - I placed a Frosted Finishes embellishment to the top of the tree, added rhinestones to the centres of the snowflakes and added more rhinestones to the photo corners.


Here's the inside of the card.  I added sparkly red and plain black CS strips to the bottom.  I inked the sentiment stamp with markers to get the three different colours, used circle punches to mat and layer and added rhinestones to the three larger snowflakes.


I stamped a Real Red snowflake swirl on the envelope flap.  I stamped the image again in Smoky Slate ink on a separate piece of white CS and used various size circle punches to cut out the snowflakes.  I edged each circle with a black Sharpie pen before gluing the circles down.  Naturally, I had to add more bling to the snowflake centres!


I really hope you'll join in with our Bling it up challenge at 52 {C}CT this week, I'd love to come and see your Christmas creations!

Supplies:
Stamps: SU! 'Season of Friendship' & 'Season of Joy' sets, Hero Arts 'Warm Wishes', snowflake swirl Inkadinkado
CS: PaperMania square white card blank, SU! Basic Black & Whisper White, SU! Red Glimmer Paper
Ink: Memento Tuxedo Black,  SU! Basic Black, Real Red & Smoky Slate, black Sharpie pen
Tools: MFT 'Photo Corners'  DieNamics die set, circle Nestabilities dies, circle punches, Stamp-a-ma-jig
Embellishments & accessories: SU! Frosted Finishes embellishment, Rhinestone Jewels


 photo DiamondRuth.gif 

Wednesday 16 October 2013

Two Blooming With Kindness Birthday Cards & A Cheeky Sleepy Cat

A lady called Sally came to my home yesterday morning to try card making, she is recently retired and is looking for a hobby to fill the long autumn and winter months and wants to find out if card making is for her.  As Sally is totally new to the hobby I thought I'd design a very simple card for her to make without using any technique aside from stamping.  I also wanted to use minimal supplies on the card - only stamps, ink and CS.  I didn't want to overwhelm her with the huge variety of products we have available to us card makers nowadays, I do think a newbie to the hobby must find it daunting!   Of course, it's hard for us seasoned card makers not to want to use all the goodies we have acquired, so just for fun, I did make a stepped up version of the card!

I decided on the Blooming with Kindness set and a colour combo of Pink Pirouette, Primrose Petals and Whisper White. I stamped the white panel, layered it onto a Primrose Petals mat and attached that to the front of a portrait oriented A6 card blank.  Here's the simple version.


Here's the inside and the envelope.


Here's the stepped up version I made.  I've kept to the same layout but I turned the design so that the card is landscape oriented.  I've added inking and edging with a sponge dauber, I've used two punches, ribbon, glitter, Dimensionals and rhinestones.  I inked the bloom stamp with Pink Pirouette ink and then gently dabbed Primrose Petals ink over the top using a sponge dauber.  I added Dazzling Diamonds glitter to the blooms.  For the sentiment oval I stamped the sentiment in Primrose Petals ink, cut out the shape with the large oval punch and stamped the bloom over the top using Pink Pirouette ink.  I edged the white panel and the pink oval with Primrose Petals ink, added the ribbon and popped up the oval.  I then punched and shaped 3 small flowers, placed them on the oval and added a rhinestone to each flower centre.   


Here's the inside and the envelope of the stepped up card.


On the morning I made these cards, one of the first things I did was get out my Pink Pirouette and Primrose Petals CS.  I opened the drawer, took out the packs and before I could close the drawer our cheeky cat Tingha climbed in, he decided it was the perfect place for a snooze!  I thought he'd find it rather uncomfortable and he'd jump out fairly quickly but after half an hour he was still in the drawer so I had to take a photo.


Over two hours later and he's still snoozing in the drawer - he's only moved in order to turn round!  Cats are funny creatures - there are loads more comfortable places in the house that Tingha could have chosen for his snooze but I guess he just wanted to keep me company in my craft room, what a sweet boy!


Supplies:
Stamps: SU 'Blooming with Kindness' & 'Wetlands' sets
CS: SU! Pink Pirouette, Primrose Petals & Whisper White
Ink: SU! Pink Pirouette & Primrose Petals
Tools:  SU! Large Oval & Itty Bitty Flower punches, sponge dauber
Embellishments & accessories:  SU! Primrose Petals stitched satin ribbon, Dazzling Diamonds glitter, Rhinestone Jewels, Dimensionals


 photo RoseRuth.gif

Monday 14 October 2013

Wheat Emboss Resist Happy Birthday Card

I saw some great Christmas card demos at my local craft shop, the Glitter Pot, a few weekends ago.  Jane Gill had a fabulous collection of cards on show made with Woodware products.  While I was at her table she demoed an emboss resist technique card using linen finish CS.  I really liked the additional subtle texture the linen finish card provided and I duly added a pack to my shopping basket.

I decided to use the technique with the gorgeous Woodware Wheat stamp. I inked the image with VersaMark ink, stamped onto a piece of linen finish CS and heat embossed with white powder.  I then added colour by sponging Scattered Straw, Wild Honey and Spiced Marmalade Distress Inks over the panel.  I buffed the panel with a piece of kitchen paper and inked the edges with Frayed Burlap Distress Ink using a sponge dauber.  I added Early Espresso ribbon, an Antique Brad and layered the panel onto an Early Espresso mat.  I made a 5 3/4" square So Saffron card base and stamped the sentiment in Early Espresso ink.  I cut two flag banners, one from Espresso CS and one from white linen finish CS.  To complete the card front I added three So Saffron buttons to the flag banners.


I used the Wheat stamp again to decorate the inside of the card and the envelope front.  It really is a beautiful image!  I also used my Spellbinder's Grommet Tag dies.  The light was dodgy by the time I took this photo, the yellow CS is definitely So Saffron although it looks more like Crushed Curry in this photo!  


Supplies:
Stamps:  Woodware 'Wheat'  clear set, SU! 'Curly Cute' set, Hobby Art 'Sentiments' clear set
CS: SU! So Saffron, Early Espresso & Whisper White, Woodware Linen Finish white CS

Ink: VersaMark, Scattered Straw, Wild Honey, Spiced Marmalade & Frayed Burlap Distress Inks, SU! Early Espresso
Tools: MFT 'Fishtail Flag Stax' dies, Spellbinder's 'Grommet Tags' dies, heat tool, paper piercing tool, sponges & sponge dauber
Embellishments & accessories: SU! white embossing powder, Early Espresso stitched ribbon, Antique Brad, So Saffron buttons


 photo mousyruth.gif 


Saturday 12 October 2013

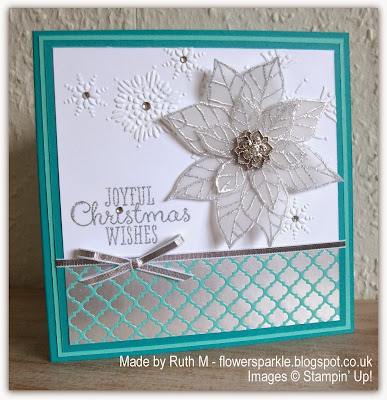
Sparkly Vellum Poinsettia Joyful Christmas Card - 52 {C}CT Oct Colour Challenge

It's time for a colour challenge at 52 {C}CT this week and Danielle, our October hostess, has switched things up by giving us two colours NOT to use!  So No Red and No Green on your Christmas cards this week.


I've opted for aquas, (Bermuda Bay and Coastal Cabana) white and silver for my card.  Danielle and I share a love of non traditional colour schemes for Christmas cards and I've loved using aquas, blues and white for quite a few Christmas cards this year!  The card base measures 5 3/4" square.  I embossed a piece of white CS with the Northern Flurry folder and stamped and heat embossed the sentiment.  I added foiled paper from the Winter Frost DSP pack, layered onto a Bermuda Bay mat, added some silver ribbon and layered onto a Coastal Cabana mat.   I then chose something that is traditionally red - I've used the wonderful poinsettia stamp from the SU! Joyful Christmas Season set. I stamped the flower twice onto vellum CS using Encore silver ink, sprinkled super sparkly Star Dust embossing powder on the image and heat embossed.  I fussy cut, layered and popped up two flower shapes to create my sparkly poinsettia.    I added a gorgeous Frosted Finishes embellishment to the flower centre and sprinkled a few rhinestones on the white panel to add more sparkle.


Here's the inside and the envelope.  I embossed the bottom piece of the white panel with the Northern Flurry folder and added a Coastal Cabana strip.  I stamped the sentiment on a separate piece of white CS, heat embossed it with Star Dust powder, stamped the frame and cut it out with the matching Apothecary Accents Framelits die.  I added tiny punched snowflakes and rhinestones.  For the envelope flap I simply stamped a portion of the poinsettia and heat embossed with Star Dust powder.


So that's what I made, please go and see what the other DT members created to inspire you and then I hope you'll play along with us at 52 {C}CT and make a Christmas card featuring non traditional colours!  I'm looking forward to visiting your blogs to see what you've made!

Supplies:
Stamps:  SU! 'Joyful Christmas' set, 'Basic Label' single stamp
CS: SU! Bermuda Bay, Coastal Cabana, Whisper White & white CS vellum

Patterned paper:  SU! 'Winter Frost' DSP
Ink: Encore Silver
Tools: SU! 'Northern Flurry' embossing folder, Apothecary Accents Framelits die, X Cut snowflake punch,  heat tool
Embellishments & accessories: Stampendous Star Dust embossing powder, SU! silver ribbon, Frosted Finishes embellishment, Rhinestone Jewels, Dimensionals


 photo DiamanteHeartsRuth.gif 

Thursday 10 October 2013

October 2013 Card Group Projects

It was our October card group meeting this afternoon, I can't believe we're in October already!  This month's projects are a Christmas easel card and two Christmas gift tags.  Lesley had seen the brayered scene Christmas easel card on this blog post and asked if that could be a card group project in October.  I was very happy to oblige as that meant I already had an example card made up!

Here's the card.


A close up so you can see the sparkly trees.


Here's the inside and the envelope.


Next up is a shaker gift tag made with the Tim Holtz Mini Cabinet die.  I cut two cabinet shapes, the front shape from Gumball Green CS and the back shape from Soft Sky CS.  I cut a square aperture out of the Gumball Green shape and taped acetate behind the aperture.  I stamped and die cut two trees, glued them to the Soft Sky shape, added punched red stars and stamped the sentiment.  I put 3D foam tape around the aperture, leaving no gaps to ensure the shaker contents don't escape.  I swiped my anti static bag over the acetate and then placed silver glass glitter, glitter flakes and white snowflake punched shapes inside, peeled off the tape and attached the two cabinet shapes together.  I punched a hole, added a reinforcing circle and threaded Raspberry Ripple ribbon through the hole.


Here's a closer view of the aperture and the shaker contents.


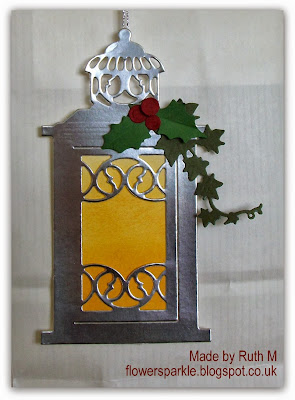
The last project is this silver lantern gift tag.  The lantern, holly and ivy are all die cut shapes.  I cut the lantern from SU! Silver Foil CS, it looks fab!  I cut a piece of Very Vanilla CS, sponged on Scattered Straw Distress Ink to create a golden glow and glued the piece to the back of the lantern.  I die cut the ivy from Always Artichoke CS, cut the holly leaves from Garden Green CS and the berries from Cherry Cobbler CS.  I used a DEET and moulding mat to add a scored line to the holly leaves.  I glued two red berries flat and popped the third one up.  I threaded silver lurex thread through a couple of holes in the top of the lantern shape as the tag hanger.  I really couldn't decide whether to add a sentiment or not, I ummed and aahed and in the end I decided not!


Here's the tag hanging from the handle of a white gift bag.


Supplies for easel card:
Stamps:  SU! 'Lovely As a Tree', 'Season of Joy' & 'Morning Meadow' sets, All Night Media 'Santa & Sleigh', PSX 'Snowflake Medley', Hero Arts 'Joyful Christmas Season' cling set
CS: SU! Marina Mist, Midnight Muse & Whisper White
Ink: SU! Island Indigo, Marina Mist, Soft Sky & Midnight Muse
Tools: brayer, 1" circle punch, plain & scalloped oval punches, Stamp-a-ma-jig
Embellishments & accessories: SU! Dazzling Diamonds glitter, Dimensionals, Post- It Note


Supplies for shaker tag:
Stamps: SU! Scentsational Season set, 'be merry' from PTI 'Tag Its #9' set
CS: SU! Gumball Green, Soft Sky, Raspberry Ripple & Whisper White, acetate
Ink: SU! Gumball Green & Raspberry Ripple
Tools:  Tim Holtz 'Mini Cabinet Card'  Movers & Shapers die, square Nestabilities die, tree die from SU! Holiday Collection Framelits die set, X Cut star punch, X Cut snowflake punch, Crop-A-Dile, 1/2" circle punch
Embellishments & accessories:  SU! Raspberry Ripple stitched satin ribbon, SU! Silver Glass Glitter, Cosmic Shimmer glitter flakes, 3D foam tape


Supplies for lantern tag:
Stamps: none
CS: SU! Always Artichoke, Garden Green, Cherry Cobbler & Very Vanilla CS, SU! Silver Foil Sheet
Ink:  Scattered Straw Distress Ink
Tools: Marianne Design Creatables 'Lantern'  die, Marianne Design Creatables 'Ivy' die, CottageCutz 'Holly Berry Mini' die, DEET & moulding mat
Embellishments & accessories: silver lurex thread, small round 3D foam pad


 photo ruth.gif

01 09 10