Saturday 31 May 2014

Snowflake Card - 52 {C}CT May Pick A Previous Challenge

As there is a 5th Saturday in May we have a Pick a Previous challenge for you this week at 52 {C}CT and we want you to Pick a Previous sketch.  We have a sketch archive HERE, so take a look, choose any sketch and then get creating.  You can substitute shapes, rotate/flip the sketch and make a square or rectangular card - as long as the basic layout comes through to us, it's all good!  Please remember to tell us which sketch you selected.


I chose sketch #17 from May 2013. 
 
After selecting the patterned paper I made an A6 size Coastal Cabana card base and I layered the paper onto a Midnight Muse mat.  I added a strip of Coastal Cabana CS, die cut the white and Midnight Muse label shapes and added the Midnight Muse ribbon.  I stamped and die cut the snowflake, added a Midnight Muse snowflake shape behind the stamped one as a shadow and popped it up.  I added Circle Dazzlers embellishments and placed a rhinestone in the centre of the snowflake to complete the card front. I went back and forth a few times about adding a sentiment - in the end I decided not to.


Here's the inside and the envelope.  I think these colours are wonderful together and I love the luxurious foil finish on the paper!


So now it's over to you to get making, link up your festive creation here at 52 {C}CT - and have fun!

Supplies:
Stamps: SU! 'Festive Flurry' set, Hero Arts 'Holiday Cheer' clear set
CS: SU! Coastal Cabana, Midnight Muse, & Whisper White

Patterned paper: SU! 'Winter Frost' DSP
Ink: SU! Coastal Cabana & Midnight Muse
Tools: Cheery Lynn 'Sentiment Tag 2' die set, SU! 'Festive Flurry' die set, Fiskars snowflake punch
Embellishments & accessories: SU! Midnight Muse stitched satin ribbon, Creative Expressions Circle Dazzler embellishments, SU! rhinestone jewels, Dimensionals


 photo RoseRuth.gif
 

Thursday 29 May 2014

Second May 2014 Card Group Projects

We're not having a card group get together in June so we've had two in May, one at the beginning of May and a second get together this afternoon.  We had a guest with us today, my friend Wendy came along as she's on holiday from work this week.  It was so lovely to have her there!

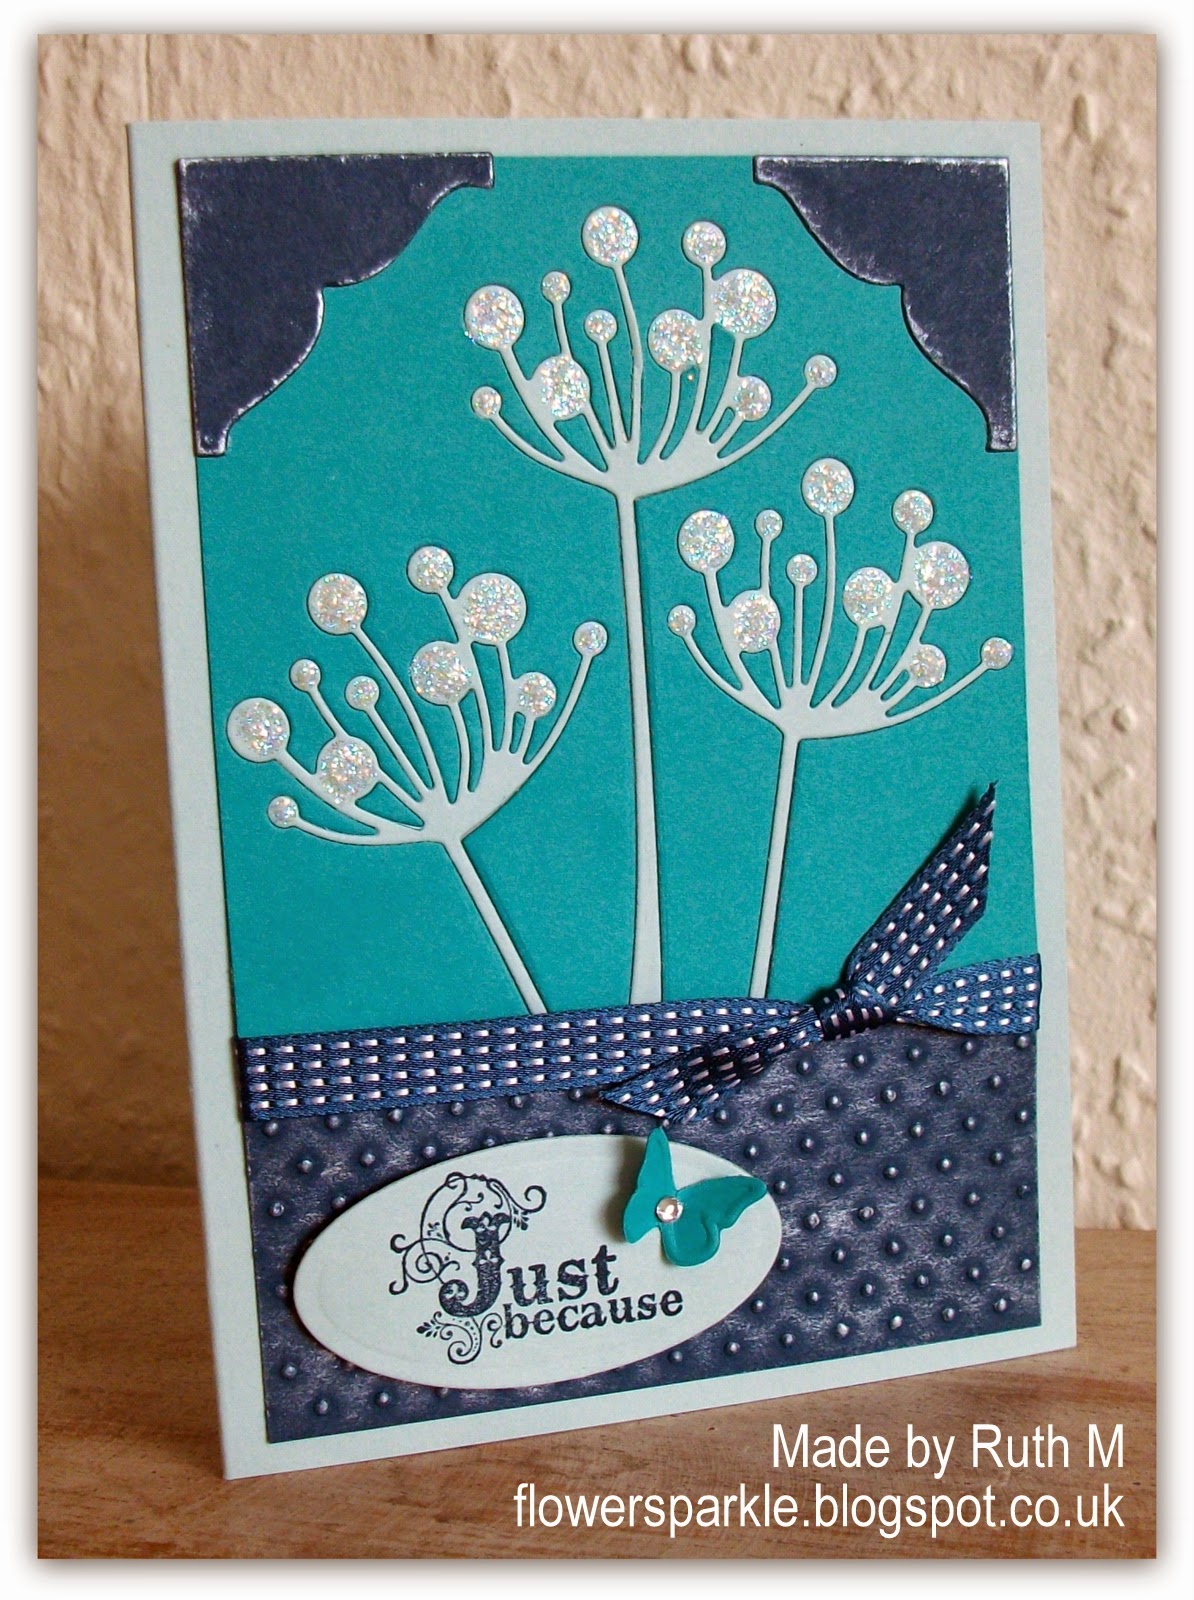
Card one is an easel card - pre folded and scored which makes it super easy!  I recently got some Inkylicious ink duster brushes after seeing them demoed and I thought I'd give my card group ladies a chance to try them out.  I think they're easier to use than the ink applicator tools in as much that you don't get the hard lines you can get sometimes with the oblong shaped sponges.  Inking with the brushes does take longer because you need to spend time laying the ink down to build up the colour.  I think I'll be using both ink applicators and dusting brushes in the future rather than selecting just the one tool.  For this card I did stick with just the ink duster brush, starting by applying Broken China Distress Ink and following that with Faded Jeans Distress Ink, on one piece of CS for the circle image and again on another piece for the strip of CS acting as the easel stop.  I stamped over both pieces with images inked with SU! Midnight Muse ink.  I used circle dies to cut out the 'Going to Seed' image plus the mat layer circles and circle punches were used for the sentiment element.  I popped up the strip and added a border die cut.  I glued on two stamped and punched butterflies to finish the card.

  
The 'Going to Seed' image is so lovely, definitely one of my faves, so I couldn't resist stamping it onto the front of the envelope!


Wendy and Jan come to my home on a Saturday once a month for a card making morning and after lunch we usually pay a visit to the Glitter Pot and spend a very happy afternoon browsing and shopping.  Wendy saw a card on display at the shop that she loved and she drew my attention to it.  I loved the card too and in fact I'd taken a picture of it a couple of weeks back and filed the idea away for future use.  As Wendy was coming to card group this time I decided to make the card as a card group project.  I've used PaperMania Eau de Nil Capsule Collection paper and I've added SU! Chocolate Chip and Bermuda Bay CS along with the white. 


Here's the inside and the envelope.  I loved the card on display when I saw it, I love the layout, the mix of embossed patterns, the delicate patterned paper and the bold pops of colour I added - and it's always good to have a butterfly!  I did NOT love making the kits up for this card, there seemed to be SO many bits to place in each kit! 


The final card uses an old stash item together with a newly acquired embossing folder.  The folder is called 'Leafy Swirl' - it has swirls and leaves, what's not to love?! - so naturally I had to have it!  Because of a cabinet malfunction I've just reorganised everything in my craft room and I've rediscovered some long neglected stash items like my Sizzix Scallop Card die.  The die is a tad too large to cut out using A4 sized CS but I've recently got some SU! 12" x 12" Old Olive CS so my neglected die got some use again.  I embossed a piece of Peeled Paint Core'dinations CS, scuffed it with sandpaper and layered it onto a Raspberry Ripple CS mat.  I stamped and die cut the sentiment banner, gluing one end flat to the card and popping the flagged end up with 3D foam pads.  I stamped two flowers, punched them out, snipped between the petals, stacked them and added a stamped and punched centre circle.  The flower centre was just crying out for a tiny gem so I added one.


Simple stamping and more tiny gems completed the inside and the envelope.


Supplies for easel card:
Stamps: Woodware 'Going to Seed' clear set, SU! 'Papillon Potpourri' set, SU! 'Very Vintage' wheel stamp (unmounted), Personal Impressions 'Medium Everyday Wishes' clear set
CS: Craftwork Cards easel card blank, SU! Marina Mist, Midnight Muse & Whisper White
Ink: Tim Holtz Broken China & Faded Jeans Distress Inks, SU! Marina Mist & Midnight Muse
Tools: circle Nestabilities dies, circle punches, SU! 'Elegant Butterfly' & 'Bitty Butterfly' punches, MFT Delicate Lace Border die,  Inkylicious ink duster brush, sponge daubers
Embellishments & accessories: 3D foam tape 


Supplies for butterfly 'Just for You' card:
Stamps: Personal Impressions 'Medium Everyday Wishes' clear set
CS: PaperMania white square card blank, SU! Bermuda Bay & Chocolate Chip, IndigoBlu thick white CS 

Patterned paper: PaperMania Eau de Nil Capsule Collection
Ink: SU! Chocolate Chip
Tools: Memory Box 'Oriel' & 'Lunette' butterfly dies, Crafts Too 'Lattice' embossing folder, Cuttlebug 'D'vine Swirl' & 'Birds & Swirls' embossing folders, circle punches, Craft Tonic butterfly punch
Embellishments & accessories: SU! Dimensionals


Supplies for Happy Birthday card:
Stamps: SU! 'Mixed Bunch' & 'Happiest Birthday Wishes' sets, Stampendous 'Sending Wishes' cling stamp
CS: SU! Old Olive, Raspberry Ripple, Pink Pirouette & Whisper White, Ranger Peeled Paint Core'dinations CS
Ink: SU! Raspberry Ripple & Old Olive
Tools: Sizzix Scallop Card Bigz XL die, Crafts Too 'Leafy Swirl' embossing folder, MFT 'Fishtail Flag Stax' Die-namics die, SU! 'Blossom' punch, SU! 3/4" circle punch
Embellishments & accessories: sandpaper, PaperMania tiny gems, SU! Dimensionals


 photo RoseRuth.gif


Wednesday 28 May 2014

Sparkly Inlaid Chloe Stems Just Because Card

Not much crafting or blogging for me the last couple of days as I've been poorly.  Glad to say I'm feeling better now which is just as well 'cos it's card group tomorrow afternoon!  Angela and Janet came round last Thursday afternoon for card making and this is the card they made.  I love the inlaid look you get by insetting positive die cut shapes into negative die cut spaces but I haven't done it for ages.  It was a new idea to my two pupils and I'm very happy to say they really liked it!

I started off by die cutting three Chloe Stem shapes from a piece of Bermuda Bay CS and three shapes from Soft Sky CS.  I inlaid the Soft Sky shapes into the Bermuda Bay panel and added tape to the back to keep the shapes in place.  I embossed a panel of Midnight Muse CS with the Swiss Dots folder, rubbed on some Pearl Moon gilding wax, added the ribbon and adhered the entire panel to the front of an A6 Soft Sky card base.  The sentiment was stamped, die cut and popped up and I die cut two decorative corners and edged them with the gilding wax.  To complete the card front I added a butterfly and rhinestone to the sentiment oval and applied Star Dust Stickles to the flower heads so they're lovely and sparkly.


The Bermuda Bay Chloe Stem shapes I'd cut earlier were used to decorate the inside of the card and the envelope.  I cut an extra one plus a Soft Sky shape so I could offset them to create a shadow effect on the envelope.  


Supplies:
Stamps: 'Just Because' from SU! 'Vintage Verses' set
CS: SU! Bermuda Bay, Soft Sky & Midnight Muse
Ink: SU! Midnight Muse
Tools: Memory Box 'Chloe Stem' die, MFT 'Photo Corners' Die-namics die set, Petite Ovals Nestabilities die, SU! 'Beautiful Wings' Embosslits die,  Cuttlebug 'Swiss Dots' embossing folder
Embellishments & accessories: SU! Midnight Muse stitched satin ribbon, Creative Expressions 'Pearl Moon' gilding wax, Star Dust Stickles, SU! rhinestone jewel & Dimensionals


 photo RoseRuth.gif


Saturday 24 May 2014

Snowman Merry Christmas Card - 52 {C}CT May Stash Challenge

This week at 52 {C}CT we've got a stash challenge for you.  We all love using our newly acquired goodies but I bet we've all got some older items that are being neglected!  I know I love it when I use something I've had for ages together with a brand new item.  So while I was thinking about new and old that wedding related saying popped into my noggin - "something old, something new, something borrowed and something blue".   I thought that would be fun to use as guidelines for a stash challenge.  I'm asking for you to use at least two of the categories - but go for it and use all 4 if you're able to! 


The three snowman stamps I've used on this card are ones I've had for many, many years and they've had a lot of use - just not recently.  Out of interest I checked my blog and found that they've not seen ink since 2010!  I do love snowman stamps and these are particular faves and I was very happy to ink them up again!  I punched snowflakes from white velvet paper that I've had in my stash for years so the stamps and paper are my old items.  The circle dazzler embellishment I used to dot the i in 'Christmas' is my new item.  I borrowed the 'merry Christmas' die from my friend Angela and I used blue CS and inks. 

I stamped the large snowman onto watercolour paper using black VersaFine ink and heat embossed the image with clear embossing powder.  I coloured him in using inks and a water brush, fussy cut him and attached him to the Island Indigo card base - I glued him flat at the bottom but popped his upper part up.  I've added glitter glue to the hat, holly berries and the snowman's nose.  I die cut the 'merry Christmas' from Pool Party CS, glued a piece of Midnight Muse CS behind the lower portion and glued it to the front of the card.  I added the punched velvet paper snowflakes and sprinkled on some rhinestones.  To complete the card front I added the circle dazzler embellishment.    


I stamped, heat embossed, coloured and fussy cut the images for inside and the envelope.  I added glitter glue to the hats and noses too! 


The rest of the DT have wonderful samples to inspire you so do check out their work.  Then get rootling through your stash for those old, buried items and play along with us at 52 {C}CT!  Just remember to use at least two of the categories when you come to make your card, I'm looking forward to seeing what you come up with!

Supplies:
Stamps: three snowman stamps from Hobby Art, Imaginisce 'Be Merry' Snag'em stamp
CS: SU! Island Indigo, Pool Party, Midnight Muse & Whisper White, watercolour paper, white velvet paper
Ink: VersaFine Onyx Black, SU! Island Indigo, Pool Party, Garden Green, Real Red, Smoky Slate & Basic Black
Tools: Memory Box 'Grand Merry Christmas' die, Fiskars snowflake punch, heat tool, water brush
Embellishments & accessories: clear embossing powder, Star Dust, Orange Peel & Xmas Red Stickles glitter glues, Creative Expressions Circle Dazzler, SU! rhinestone jewels, Dimensionals


 photo RoseRuth.gif

Thursday 22 May 2014

Lilac & Linen Birthday Card

A house a few doors up from us has a beautiful lilac tree which bloomed a couple of weeks ago.  It has such a deep rich colour - almost Rich Razzleberry - and a wonderful scent.  Seeing it again this year reminded me to ink up my two-step lilac stamp set to make a card.

I used Pale Plum and Rich Razzleberry inks for the flowers and Old Olive for the leaves and stem.  After stamping the lilac I stamped over the piece with the linen background stamp in stamped off Crumb Cake ink - I love how that looks with these particular stamps!  I die cut the image and edged the panel with Crumb Cake ink.  I die cut a piece of Rich Razzleberry CS, inked the inside of my Lacy Brocade embossing folder with VersaMark ink, embossed the piece of CS and then applied Blush Perfect Pearls powder so there's a lovely pearly sheen.  I popped up the lilac panel and added the circle sentiment element.  I really enjoyed working with my old stamps and using a technique that I haven't done for ages!


Here's the inside and the envelope with more lilacs and linen.


Off upstairs to gather crafty supplies now in preparation for Angela and Janet coming today for a card making afternoon.  I have an appointment this morning that I'm not looking forward to but knowing that I have a crafty afternoon ahead is helping!

Supplies:
Stamps: SU! 'Blossoms Abound' & 'Blooming with Kindness' sets, Linen background stamp, 'Have a wonderful day' from Hero Arts
CS: SU! Crumb Cake, Rich Razzleberry & Whisper White
Ink: SU! Pale Plum, Rich Razzleberry, Old Olive & Crumb Cake, VersaMark
Tools: X Cut 'Rectangle Parenthesis 1' die set, SU! 'Lacy Brocade' embossing folder, circle punches, flower punch from SU! 'Itty Bitty Shapes' punch pack, sponge dauber
Embellishments & accessories: Blush Perfect Pearls powder, SU! rhinestone jewels, Dimensionals


 photo RoseRuth.gif 


01 09 10